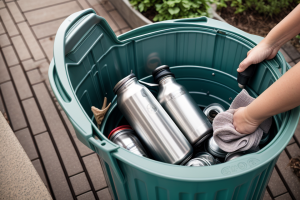
Cleaning dirty cans can be a daunting task, but it’s important to keep them in good condition to prevent bacterial growth and odors. Whether you’re dealing with rusty cans or those that have been contaminated with food residue, there are several methods you can use to effectively clean them. In this comprehensive guide, we’ll explore the best ways to clean dirty cans, from using household items to more specialized cleaning solutions. With these tips, you’ll be able to keep your cans looking and smelling fresh, and avoid any potential health hazards. So, let’s get started!
Preparing for Cleaning
Gathering the Necessary Supplies
Before starting the cleaning process, it is important to gather all the necessary supplies. This will ensure that you have everything you need to effectively clean your dirty cans. Here is a list of the required cleaning supplies:
- Rubber gloves
- Scouring pad or steel wool
- Bucket or large container
- Mild detergent or soap
- Water
- Scraper or spatula
- Cloth or sponge
- Cleaning solution (if needed)
Let’s take a closer look at each of these supplies and their purpose:
- Rubber gloves: Wearing rubber gloves will protect your hands from any dirt or grime that may be on the cans. It is important to use rubber gloves to avoid getting your hands dirty and to keep them clean.
- Scouring pad or steel wool: A scouring pad or steel wool is used to scrub the cans and remove any stubborn dirt or stains. Steel wool is abrasive and can scratch the surface of the cans, so it is important to use a scouring pad instead if possible.
- Bucket or large container: A bucket or large container is needed to soak the cans in water and cleaning solution if necessary. This will ensure that the cans are fully submerged in the cleaning solution and that they are completely clean.
- Mild detergent or soap: Mild detergent or soap is used to clean the cans. It is important to use a mild detergent or soap to avoid damaging the surface of the cans.
- Water: Water is used to rinse the cans after they have been cleaned. It is important to use clean water to avoid leaving any residue on the cans.
- Scraper or spatula: A scraper or spatula is used to remove any tough grime or stains from the cans. It is important to use a scraper or spatula to ensure that all the dirt and grime is removed from the cans.
- Cloth or sponge: A cloth or sponge is used to wipe down the cans after they have been cleaned. It is important to use a clean cloth or sponge to avoid leaving any residue on the cans.
- Cleaning solution (if needed): If the cans are particularly dirty, a cleaning solution may be needed. There are many different cleaning solutions available, but it is important to use a solution that is safe for metal surfaces.
By gathering all of these necessary supplies, you will be well-prepared to effectively clean your dirty cans.
Removing Labels and Liners
Removing labels and liners is an essential step in preparing for cleaning dirty cans. Labels and liners can trap dirt and debris, which can make it difficult to thoroughly clean the can. Removing these components also allows for better access to the inside of the can, making it easier to remove any remaining debris or residue.
There are several methods for safely removing labels and liners from cans. One method is to use a dull knife or spoon to gently pry off the label. It is important to be cautious when using a knife or other sharp object, as it can easily damage the can. Another method is to use a label remover solution, which can be purchased at most hardware stores. This solution is applied to the label, and then the label is removed after it has soaked for a few minutes.
Regardless of the method used, it is important to be gentle when removing labels and liners to avoid damaging the can. It is also important to remove any remaining adhesive residue from the can to ensure a thorough cleaning.
Cleaning the Cans
Physical Cleaning Methods
Brushing and Scouring Techniques
One of the most common physical cleaning methods for dirty cans is to use a brush or scouring pad. A brush can be used to scrub away any residue or buildup on the surface of the can, while a scouring pad can be used to remove more stubborn stains and grime.
To use a brush or scouring pad, simply wet the surface of the can with warm water and then scrub away any visible dirt or debris. It’s important to use a gentle, circular motion to avoid scratching the surface of the can. If there is particularly stubborn grime, you may need to use a stronger cleaning solution or repeat the process several times.
Using Steam or Boiling Water to Clean
Another effective physical cleaning method for dirty cans is to use steam or boiling water. This method is particularly useful for cleaning cans that have a lot of residue or buildup.
To use steam to clean a can, simply fill a pot with water and bring it to a boil. Then, place the can in the pot and cover it with a lid. The steam from the boiling water will help to loosen and remove any dirt or debris on the surface of the can.
Alternatively, you can also use a steam cleaner or a pressure washer to clean the cans. These tools can provide a more intense cleaning action and can be especially useful for cleaning large or heavy-duty cans.
The Effectiveness of Each Method
Overall, all of these physical cleaning methods can be effective for cleaning dirty cans. However, the method you choose will depend on the level of dirt or debris on the surface of the can, as well as the type of can you are cleaning.
Brushing and scouring techniques are best for removing light to moderate levels of dirt or debris, while steam or boiling water are better suited for more stubborn stains and grime. It’s important to choose the right method for the job to ensure that your cans are thoroughly cleaned and ready for use.
Chemical Cleaning Methods
Types of cleaning agents and their applications
- Strong alkaline detergents: These cleaners are effective at breaking down grease and grime, and are often used in commercial settings.
- Acidic cleaners: These cleaners are ideal for removing stubborn stains and mineral deposits. They are typically used on cans that have been exposed to harsh water conditions.
- Enzymatic cleaners: These cleaners contain enzymes that break down organic matter, such as food residue. They are effective on cans that have been contaminated with food or beverages.
Safety precautions when using chemical cleaners
- Always read the label and follow the manufacturer’s instructions.
- Wear gloves, eye protection, and a dust mask when working with strong chemicals.
- Work in a well-ventilated area to avoid inhaling fumes.
- Never mix different types of cleaners, as this can cause a hazardous reaction.
Proper disposal of cleaning agents
- Follow the manufacturer’s instructions for safe disposal.
- Do not pour cleaning agents down the drain or into the ground.
- Dispose of cleaning agents in accordance with local regulations.
Combining Physical and Chemical Cleaning Methods
Combining physical and chemical cleaning methods is a highly effective way to thoroughly clean dirty cans. This approach allows for the removal of both stubborn dirt and grime, as well as any residual chemicals that may be present. Here is a step-by-step guide to combining physical and chemical cleaning methods:
- First, physically clean the cans by scrubbing them with a soft-bristled brush and mild detergent. This will remove any visible dirt and grime.
- Next, apply a chemical cleaner to the cans. Make sure to follow the instructions on the cleaner’s label, as some may require a certain amount of time to work before rinsing.
- Allow the chemical cleaner to sit on the cans for the recommended amount of time. This will give it time to penetrate any remaining dirt and grime.
- After the recommended time has passed, rinse the cans thoroughly with warm water to remove any remaining chemical cleaner.
- Finally, dry the cans completely before using them again. This will help prevent any residual moisture from leading to the growth of bacteria or other microorganisms.
By following these steps, you can effectively clean even the dirtiest of cans, leaving them fresh and ready for use.
Tips for Cleaning Difficult-to-Reach Areas
Cleaning the inside of a can can be a challenge, especially when it comes to reaching the areas around the base and the rim. However, with the right techniques and tools, it is possible to effectively clean even the most difficult-to-reach areas.
Techniques for Cleaning Inside the Rim
One of the most challenging areas to clean is the inside of the rim. To clean this area, you can use a soft brush or cloth to reach into the tight space and scrub away any grime or residue. You can also use a small amount of dish soap or vinegar to help loosen and remove any stubborn dirt or stains.
The Use of Brushes and Other Tools
In addition to using brushes or cloths, there are a variety of other tools that can help you clean difficult-to-reach areas around the base of the can. For example, you can use a long-handled brush or a flexible cleaning rod to reach into tight spaces and scrub away any dirt or grime. You can also use a can opener to carefully pry open the can and clean the inside more easily.
Tips for Successful Cleaning
To ensure that you are able to effectively clean even the most difficult-to-reach areas, it is important to follow a few key tips. First, make sure that you are using the right cleaning supplies, such as soap or vinegar, to help loosen and remove dirt and grime. Second, be patient and take your time when cleaning, especially when working in tight spaces. Finally, don’t be afraid to use a variety of tools and techniques to help you reach and clean all areas of the can.
By following these tips and using the right techniques and tools, you can effectively clean even the most difficult-to-reach areas of a dirty can.
Restoring the Cans
Inspection and Rinse
In order to effectively clean dirty cans, it is important to begin with a thorough inspection and rinse. This process will ensure that all remaining residue is removed before proceeding with more intensive cleaning methods.
Examining the Cans for Remaining Residue
Before attempting to rinse the cans, it is important to carefully examine them for any remaining residue. This can be done by holding the can up to the light and looking for any stains or discoloration that may indicate the presence of residue. It is also helpful to shake the can gently to see if any loose debris falls out.
Rinsing with Clean Water to Remove Any Remaining Debris
Once the cans have been inspected and any remaining residue has been identified, they can be rinsed with clean water to remove any remaining debris. It is important to use clean water to avoid introducing any additional dirt or contaminants into the cans. It is also recommended to use a clean, non-abrasive sponge or cloth to avoid scratching the surface of the cans.
It is important to rinse the cans thoroughly, paying close attention to any areas with visible residue. It may be necessary to repeat the rinsing process several times to ensure that all remaining debris is removed.
After the cans have been rinsed and inspected, they are ready for more intensive cleaning methods, such as using a can cleaner or scrubbing with a soft brush.
Drying and Storing
When it comes to restoring dirty cans, proper drying and storage techniques are crucial to prevent rust and further damage. Here are some methods for drying the cans and tips for storing them safely.
Methods for Drying the Cans
- Air Drying: This is the simplest method for drying cans. Simply place the cans in a well-ventilated area, making sure they are not touching each other. This method may take longer, but it ensures that the cans are completely dry, which is essential for preventing rust.
- Towel Drying: Gently wipe the cans with a clean, dry towel to remove any excess moisture. This method is quicker than air drying and can be helpful when dealing with a large number of cans.
- Heat Drying: Using a heat gun or a hairdryer on a low setting can help speed up the drying process. Be careful not to apply too much heat, as it can cause the cans to warp or get damaged.
Proper Storage Techniques
- Clean and Dry Storage Area: Make sure the area where you plan to store the cans is clean and free of moisture. Moisture can cause rust and corrosion, so it’s important to keep the storage area dry.
- Store in a Cool, Dry Place: Store the cans in a cool, dry place, away from direct sunlight and moisture. This will help prevent rust and extend the life of the cans.
- Keep Them Upright: Store the cans upright, rather than stacking them on top of each other. This will help prevent the cans from getting dented or damaged.
- Inspect Regularly: Check the cans regularly for any signs of rust or damage. If you notice any issues, take appropriate action to prevent further damage.
By following these methods for drying and storing cans, you can help prevent rust and ensure that your cans remain in good condition for a long time.
Reusing Cans
Reusing cans can be a great way to reduce waste and save money. By cleaning and sanitizing the cans properly, they can be used multiple times, which can help reduce the amount of waste generated by packaging materials.
However, there are some safety considerations to keep in mind when reusing cans. First, it’s important to make sure that the cans are thoroughly cleaned and sanitized before reuse. This can help prevent the growth of bacteria and other microorganisms that can contaminate the contents of the can.
To ensure that the cans are properly cleaned and sanitized, it’s important to use the right cleaning methods and tools. This may include washing the cans with soap and water, using a cleaning solution, or using a commercial can cleaner. It’s also important to make sure that the cans are completely dry before use.
Additionally, it’s important to check the cans for any signs of damage before reuse. This can include checking for dents, rust, or other signs of wear and tear. Any damaged cans should be discarded to prevent them from leaking or contaminating the contents.
By following these tips, you can safely and effectively reuse cans, which can help reduce waste and save money.
FAQs
1. What are some common causes of dirty cans?
Some common causes of dirty cans include poor storage, exposure to dirt and debris, and frequent use. Additionally, if cans are not cleaned properly after use, they can become contaminated with bacteria and other microorganisms.
2. How do you know when cans are dirty?
Dirty cans may have a buildup of dirt and debris on the outside, and may have a buildup of residue or stains on the inside. Additionally, if cans are contaminated with bacteria or other microorganisms, they may have a strong, unpleasant odor.
3. What are some effective methods for cleaning dirty cans?
There are several effective methods for cleaning dirty cans, including using soap and water, using a mixture of vinegar and water, or using a commercial cleaning solution. It is important to thoroughly clean cans before using them again to prevent the buildup of bacteria and other microorganisms.
4. How often should cans be cleaned?
Cans should be cleaned regularly, especially if they are used frequently. It is recommended to clean cans after each use to prevent the buildup of dirt and debris, and to remove any residue or stains.
5. Are there any tips for cleaning cans that have stubborn stains or residue?
Yes, there are several tips for cleaning cans that have stubborn stains or residue. One effective method is to use a mixture of baking soda and water to scrub the stains, and then rinse the cans thoroughly with soap and water. Another tip is to use a commercial cleaning solution that is specifically designed to remove stubborn stains and residue.
6. Can dirty cans be recycled?
No, dirty cans should not be recycled. It is important to clean cans before recycling them to prevent the buildup of bacteria and other microorganisms, which can contaminate other recyclable materials.
7. What are some best practices for storing clean cans?
Some best practices for storing clean cans include storing them in a cool, dry place, away from direct sunlight and moisture. It is also a good idea to store cans in a secure location to prevent them from being damaged or contaminated.